1. Choose a Qualified Installer
Seek out licensed, NABCEP‑certified installers who can provide a detailed proposal, including system design, permitting timeline, and projected savings. For example, Professional Solar Panel Installation in Houston offers a turnkey solution that integrates local incentives and fast permitting.
2. System Design and Sizing
Using your historical electricity usage (typically found on your utility bill), an installer will size the system to offset 80‑100 % of your consumption. Advanced modeling software accounts for seasonal variations and future load growth.
3. Permitting and Interconnection
Most jurisdictions require electrical and building permits. The installer will submit plans to the city’s planning department and coordinate with the utility for interconnection agreements.
Table of Contents
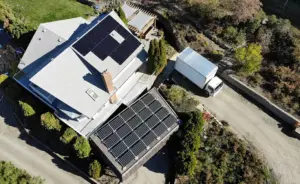
4. Installation and Commissioning
Installation usually takes 1‑3 days for a residential system. After mounting the racking, panels are secured, wired to the inverter, and connected to the grid. A final inspection confirms compliance with local codes.
5. Monitoring and Maintenance
Modern inverters feature web‑based dashboards that display real‑time production, enabling you to track performance against projected output. Routine cleaning (once or twice a year) and a 10‑year inverter warranty keep the system running efficiently.
Real‑World Success Stories
Concrete examples illustrate how quickly savings can materialize:
Houston, Texas
A 5.5 kW system installed on a suburban home reduced the household’s monthly bill from $180 to $55, delivering a 68 % reduction. Leveraging the Texas Property Assessed Clean Energy (PACE) program, the homeowner financed the project with zero upfront cost and began saving from day one.
Denver, Colorado
In Top Rated Solar Panel Installation Denver, a family adopted a 7 kW system paired with a battery storage unit. The combined setup allowed them to power their home during peak‑price periods, shaving an additional $600 off the annual electricity expense.